• Skip to primary navigation
  • Skip to main content

Super Lite

  • Buying Guides
  • Styles & Trends
    • Wall Lights
    • Bathroom Lights
    • Ceiling Fans
    • Ceiling Lights
    • Lamps
    • LED Lights
    • Outdoor Lights
    • Smart Lights
  • Wellness & Safety
  • Shop Lighting

Ceiling Lights

12 Tips for Choosing and Hanging the Perfect Dining Light

12 Tips for Choosing and Hanging the Perfect Dining Light

by admin · May 5, 2023

Whether it’s time to impress your new neighbors or host an important business dinner, your dining room is a high-impact space that communicates a lot about you. Some dining rooms are an informal extension of the kitchen, while others are a spacious, separate room. No matter what yours looks like, choosing the right design (and light) can create the perfect setting for all occasions. 

Size

Photographee.eu/Shutterstock.com

1. To determine the best size for your fixture, use this formula: Length + Width = diameter of your ideal light. Example:  10’ (length) + 14’ (width) = 24” (width of your light). It’s a general rule, so use it at your own discretion and adapt to suit your preferences!

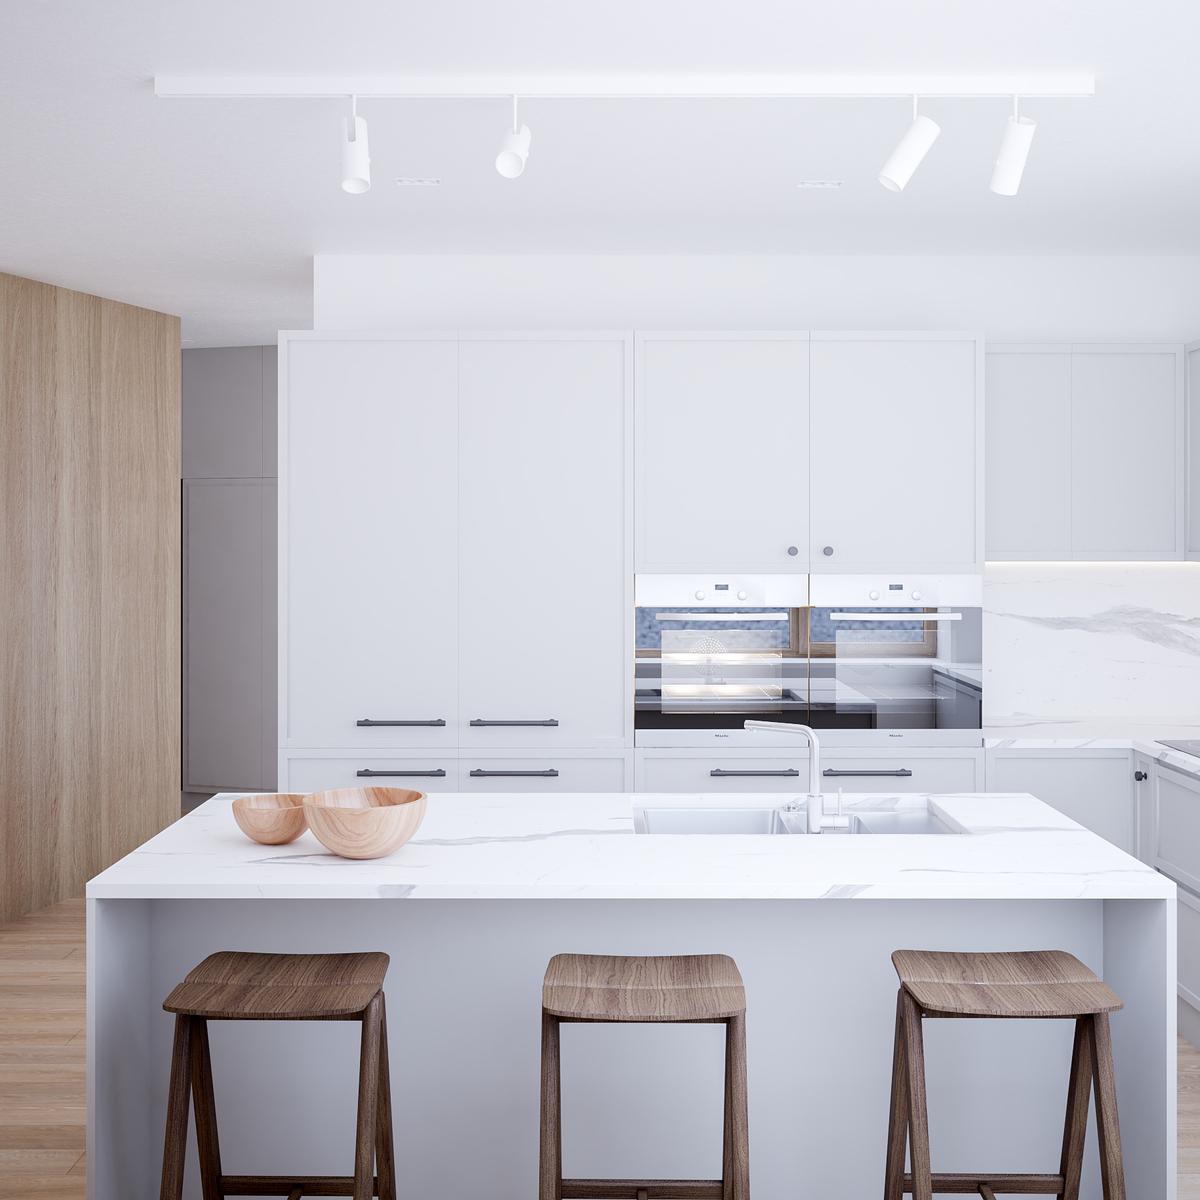
2. Long dining tables call for bigger lights. Consider a long track light or even mount two fixtures on either end of the table. It’s a great way to emphasize your lovely, lengthy dining space!

Style

Brad Malcom/Shutterstock.com

3. The style you select reflects your personal taste, but also affects the function of the light. Shaded lights provide soft, subtle light, while glass fixtures diffuse light more brightly and evenly. Exposed bulbs provide the most clear, crisp light.

4. If your dining room branches off your kitchen, consider matching the finish of the dining light to the finish of kitchen lights or hardware.

5. If your dining room is separate from the kitchen, feel free to choose a distinct finish for a unique dining room atmosphere. Just remember that it should still ‘live well’ with any visible fixtures from surrounding rooms.

Height

zhu difeng/Shutterstock.com

6. Know your ceiling height before selecting a light. Most fixtures are designed for an 8-foot ceiling.

7. If you have a vaulted ceiling, use some of that space for the fixture, but keep it mounted low enough that it still feels like a cohesive part of the dining table ensemble. 

8. Proper mounting height is 30-36 inches from the top of your table to the bottom of the fixture.  That figure can be a little higher on a taller ceiling.  

9. Fixtures with decorative pieces or hanging crystals may hanger lower than the recommended 30-36”. For these fixtures, measure to the frame of the light instead. 

Wattage

Jodie Johnson/Shutterstock.com

10. The general recommendation for dining light output is 300 watts. This is especially true for rooms with lighter paint colors.

11. In dining rooms with darker paint, consider choosing bulbs that provide 400 watts or more.

12. For additional control and extra ambiance, use dimmable bulbs and install a dimmer switch in your dining room. It’ll serve equally well for full-light projects and dimly-lit romantic dinners. 

Make your dining room an inviting space with an expressive, efficient fixture. For any additional questions, feel free to contact our expert team here at Super Lite. We’re here to help you make your dream home!

Filed Under: 2021, Ceiling Lights, Styles & Trends

Break into Farmhouse Flair with Your Home Lighting

Break into Farmhouse Flair with Your Home Lighting

by admin · Apr 28, 2023

If the down-home charm of farmhouse style speaks to you, you’re not alone! It’s a trendy style with staying power, and now’s a great time to start adding farmhouse décor around any home. If you’re unsure how to start, however, switching out your light fixtures is the perfect starting point. There’s no repainting, rearranging wall hangings, or reupholstering involved- just a simple swap to get the look you want!

Here are some of our favorite ideas that add a touch of that Farmhouse Flair:

Electric Candles

Svetlana Lukienko/Shutterstock.com

Sure to add an atmospheric glow to any event, candlelight is one of the best ways to slip some farmhouse fashion into your home.  It’s rustic, reminiscent of simple times, and charming in all the right ways.

Rough, Unfinished Metals

Don’t be afraid to flaunt some rust and roughness in your metal décor. Whether it’s a functional light fixture that’s made to look aged and distressed or simply a decorative lighting piece like this lantern, aged metal is a farmhouse staple.

Rope or Twine Details

Jordan Confino/Shutterstock.com

As a compliment to the fresh, finished pieces of your décor, try some unfinished twine-like lighting. The rope cords add excellent texture and depth, and the combined effect is a rustic, upscale farmhouse look fitted for any room.

Imitation Fencing or Caging

Breadmaker/Shutterstock.com

If you’re looking for just a small touch of farmhouse style, try a gentle nod to farmhouse with cage-like metal fixtures. They’re easily hung anywhere in your home, and they’re versatile enough to match with any kind of décor if you decide to redecorate later.

Bolts, Nails, and Screws

ronrapee/Shutterstock.com

Imagine hand-constructed barrels, fencing, wagons, and more when you look at the quaint bolt details on this ceiling fan. Ultra-functional and fashionable, it’s great for any room in your home. Even better? Try it in an outdoor, covered area- just make sure the fixture is damp-area rated!

Bleached or Faded Wood

Almost nothing says “farmhouse” more than bleached, faded, or distressed wood. This fixture is simple and unassuming, but adds some textured dimension to the space. Add that to the rich green hues on the walls and linens… we love the look!

Mixed Material Fixtures

Chris Haver/Shutterstock.com

Metals, fabrics, chains, woods, and more… Farmhouse is a fresh take on an old-fashioned look, and it really shines in fixtures that use various materials to bring old and new worlds together.

Old-Fashioned Bulbs

With the right bulb in place, simple fixtures are automatically transformed into something quaint. Those old-style bulbs are comforting, familiar, and full of farmhouse flavor. Best of all? You can add them to an existing fixture for an extra simple update!

Do you like what you see? Props to farmhouse décor for serving up some beautiful details that are ready to brighten your home. Contact us at Super Lite for more information about farmhouse-friendly lighting or any other home lighting needs!

Filed Under: 2021, Ceiling Lights, Styles & Trends

How to Safely Install a Ceiling Fan

How to Safely Install a Ceiling Fan

by admin · Mar 12, 2023

Installing a new ceiling fan is a cheap way to save on energy costs all year without compromising on comfort. In the summer, ceiling fans cool down the house by creating a breeze. In the winter, they help circulate the heated air to warm the whole room evenly. 

Putting in a ceiling fan is a win-win for your comfort levels and your budget – and it’s a pretty simple DIY project for homeowners. Plan on giving yourself a few hours (depending on the type of fan and your experience level with lighting DIYs), and grab a friend that can help you hold things in place while you work.

If you’re buying a ceiling fan new, it should come with thorough installation instructions. We always recommend following those instructions exactly to be sure that your fan is installed safely and properly. If you’re installing a secondhand fan, you may be able to find the installation guide online by searching with the model number on the fan. Either way, we’ll walk you through the basic steps here so that you can prepare. 

1. Preparation

Before you break out your tool belt, make sure you have a good plan in place. There’s nothing worse than being in the middle of a project and realizing you don’t have everything you need to complete the task.

Tool Checklist

Before you take on a ceiling fan installation project, make sure you have all the tools you need so you don’t have to rush off to your local hardware store for a last-minute purchase. To install a ceiling fan you’ll need to have a:

  • Voltage Tester
  • Ladder
  • Measuring Tape
  • Screwdriver
  • Ceiling Fan-Rated Junction Box
  • Fan Brace
  • Wire-Cutter/Stripper
  • Light Bulbs
  • Globes/Shades if they aren’t included
  • An extra-long downrod if you’re installing on a sloped ceiling
  • Ceiling Fan and Kit

Choosing the Right Fan Size

Measure the room you’re working in before you start. Not all fans are created equal, so pick one that will fit. Use the following guidelines to help. 

  • For rooms smaller than 75 square feet (like bathrooms), pick a fan with blade spans of less than 36 inches.
  • Blade spans between 36 and 42 inches are ideal for rooms up to 144 square feet. 
  • A 44-inch span is perfect for rooms up to 225 square feet, like a dining room.
  • For rooms that are 225 square feet or larger (a large living room, for example), you’ll need a fan with a 50 to 54-inch blade span.
  • The more space between the ceiling and the fan, the better! The ideal ceiling fan height is 8-9 feet above the ground. 
  • If your ceiling is less than 8 feet, you’ll most likely need to install a flush-mount fan (no downrod).
  • High pitched ceilings typically require you to buy an extra-long downrod (so that the blades won’t hit the sloped ceiling), so check your ceiling height and angle before choosing your downrod.

Pro Tip: Once your fan is installed, the tips of the blades should be at least 30 inches from the walls, and the bottom edges of the blades should be at least 7 feet above the floor. 

Other Important Tips

  • Ceiling fans are heavy! They need to be anchored properly to an electric ceiling box designed to hold the weight of the fan. Inspect the electrical box to ensure it’s fan-rated. There should be an inscription on the box to indicate this. If it’s not, you’ll also need to purchase a fan box before you get started.
  • Check to make sure the light switch you’re using is wired appropriately for the fan. If it isn’t, you may need to call a professional to get the job done.
  • Check the ceiling joists for any wiring or plumbing pipes that may be in the way.
  • If you’re adding a new fan where one didn’t exist, check local building codes to determine if you need a permit.
  • Always check your installation guide for any additional requirements that are specific to your fan. For some expert help choosing the perfect fan for your space, give us a visit or a call and we’d be happy to help.

2. Safety

Now that you’re ready to begin, head out to your circuit breaker and turn the power off for the room where you’ll be installing your fan. Also, make sure all of the wall switches in the room are safely in the “off” position. Do not rely on a wall switch alone to protect you from electrical shock! Always use a voltage tester to be sure the power is off before handling wires.

Pro Tip: Place some electrical tape over the switches you’ve turned off on the circuit breaker. This will prevent anyone from switching it back on while you’re working.

3. Remove Your Old Fixture

Let’s get started! First, you’ll need to take down the existing fixture. Most fixtures have easy-to-find attachment points, like screws or twist-off caps. Remove accessories like light bulbs, shades to get down to the base of your fixture, then unscrew the base from the ceiling.

If you’re removing an existing ceiling fan, remove the light bulbs and globes first. Then, take down the light kit (if needed – some fans have them, some don’t). Unscrew and remove the fan blades next. At this point, you may need to enlist a helper as the full weight of the fan base and motor can be heavy. Pull off the canopy (metal cover at the base of the fan). The last step is to remove the mounting bracket with a screwdriver!

Once you have the base of your fixture dropped away from the ceiling, unscrew the wire nuts connecting it to the electrical box. Be sure to test the wires with your voltage tester first!

4. Install a Fan Box

Before you start, check your existing electrical box. If it isn’t rated to support the weight of your fan, you’ll need to install a new one. To see if your existing box is rated to hold a fan, just take a look at the label! If you can’t find a label, err on the side of caution and get a new one. 

You’ll have to do a little bit of homework here to figure out what will work best for your project. Fan boxes are easiest to install if you have open access, like in the attic or an unfinished ceiling. If you won’t have easy access you may need to widen your drywall hole a little, but you can usually find a brace that will slip through the existing hole. 

Take a look at your rafters to determine the best way to install your fan box. Fan boxes can be attached directly to the rafter with a side bracket. If your new fan won’t be right next to a rafter, look for a brace that will span the space between two rafters. These braces can be a little trickier to install through a small hole in the ceiling, but they’ll give you a lot more breathing room when it comes to getting your fan box in the right place. 

5. Install the Mounting Bracket

To secure the mounting bracket to the fan box, start by threading the wires through the mounting bracket. If the fan has a slide-on bracket, leave the bolts on the junction box, slide the bracket over the mounting hardware, and tighten the screws. For fans without a slide-on bracket, place the bracket over the mounting bolts that poke through the bracket. Then, secure it using the provided nuts. If your fan is a flush mount, pull the wiring through the canopy (the part that covers the wiring/mount bracket) and skip to step 7.

6. Install the Downrod

To set the downrod, you’ll want to find a flat work surface. Slip the canopy onto the downrod and pull the primary wires through the hollow downrod. Then, connect the downrod to the fan base. With the downrod and base assembled, attach the other end of the downrod to the mounting bracket. 

7. Wire the Fan

Next, it’s time to wire! Hang the downrod – or canopy, if you’re installing a flush mount fan – on the hook on the mounting bracket. If there isn’t a good place to hang it, phone a friend to hold the fan up for you to free up your hands while you connect the wires. 

Before you start, check to make sure all your wiring (and the wire nuts) will fit in the ceiling. Use your wire cutters to trim down any wires that won’t. This will also keep them from vibrating against the canopy when the fan is on. Use wire strippers to expose the copper of the wires on the new ends. 

Connect the corresponding wires using the provided wire nuts. Your installation guide will have a diagram to follow, but, generally speaking, the fan’s green wire connects to the ground wire, the fan’s black motor wire connects to the black supply wire, and the fan’s white wire connects to the white (or neutral) supply wire. 

Double-check your work against the diagram, then gently push the wires into the junction box. Lift the fan into position, then clip it to the mounting bracket and secure the screws.

Pro Tip: Some fans come with additional wires for extra features, like having a separate switch for the light and fan. If your switches or wires don’t match the diagram, you might need to check in with an electrician or a lighting specialist at our showroom to help you get things set up correctly.

8. Blades and Bulbs

Now it’s time to install the fan blades. Every fan is a little bit different – but most fans will have an arm or bracket that you’ll need to attach to the blade and then to the base using a screwdriver. Some fans have quick-install blades that speed up the process using keyhole slots that slip over the fan’s mounting screws and lock into place with a little tug. 

Some fans have reversible blades – so make sure you’re checking each time that you have the correct side pointed down!

By now, you should be seeing the light at the end of the tunnel – so let’s install the bulbs! For fans with a light kit, refer to your guide to ensure everything goes in place correctly. Generally, you’ll just need to install the shades, globes, or light cover. If your fan did not come with bulbs, make sure the bulbs you install have the correct base type and wattage 

If your fan came with a remote, don’t forget to install the remote control holder!

9. Lights… Fan… Action!

Last, but not least, it’s time to test out your new ceiling fan! Go back to your circuit breaker and turn the power back on. Try switching your fan and lights on and off using the light switch or remote control. Test all of the speed settings to make sure your fan is secured properly and doesn’t wobble or rattle.

Most of the time, installing a ceiling fan is a pretty straightforward DIY project. Occasionally, an odd issue can crop up due to things like old wiring. If you run into any trouble, be sure to give us a call right away, or call an electrician that can help you troubleshoot the issue.

—

Congratulations DIY master! Now that you’ve successfully installed your new ceiling fan, get ready for a fresh breeze to blow your way–and some savings too. With all that extra cash blowing around, come visit us and we’ll help get you started on your next project. 

—————————-

DISCLAIMER: Be sure to follow all the manufacturer’s installation instructions and take all recommended safety precautions. Check before installing to see if you need a permit and be sure all building and electrical codes are observed. If you have any questions or are unsure about installing the fan yourself, contact a licensed electrician or Super Lite for more help.

Filed Under: 2023, Ceiling Fans, Ceiling Lights, How to, Informational, Wellness & Safety

Upgrading Your Lighting on a Budget

Upgrading Your Lighting on a Budget

by admin · Mar 11, 2023

All the Tips, Tricks, and Secrets You Need to Make Your House Shine on a Dime

If it’s been a while since you redecorated, your current home decor probably isn’t speaking to you anymore. When you’re short on time, updating the lighting is one of the fastest ways to make your home look, well, brighter. But, when you’re on a budget, replacing everything in the house just isn’t the right call. The good news is – you don’t have to! Here’s a few easy, creative, and budget-friendly ways to make your home feel bigger and brighter… without breaking the bank.

1. Swap Your Light Bulbs

Many people blame an old fixture for their lighting woes, when really it’s the bulbs to blame. Try swapping out your old bulbs with a fresh set of brighter LED bulbs!

While LED lights may cost more upfront, they use at least 75% less energy – which means they can give off more light and use less power. They also last up to 25 times longer than traditional light bulbs, so they’ll last for years before they need to be replaced. 

2. Do it Yourself

The cost of lighting installation can eat away at your budget quickly, but it can reduced if you’re willing to do a little research and put in some work. Installing lighting yourself can give you some extra cash to get lights you love.

Before tearing out any fixtures, educate yourself on the proper safety precautions! If you’re unsure about doing it yourself, don’t forget to budget for the professional help you’ll want!

3. New Shades, New Me

If your light fixture comes with shades – whether they’re glass, fabric, or metal – you might be in luck! Did you know you can replace the shades or globes on most fixtures that have them? A new set of shades is WAY cheaper than buying an entirely new light fixture, and it will make just about any fixture feel brand new again! With a like-new fixture, your space will match your style, leaving you (and your wallet) feeling happier.

4. Refinish Your Fixture

Another alternative solution to buying a new light is changing the finish of your existing fixture. With a little rub n’ buff and a handy youtube tutorial, your light will look totally different! This may need some touching up down the road, but when you need a quick fix to get you by until you can invest in a higher-quality fixture, a little DIY magic can help stretch your money. A little finish can take your fixture from outdated to updated while keeping your budget happy. 

5. Mirror, Mirror

In our opinion, quality lighting makes the biggest difference in a home, but adding mirrors can also increase light–if they’re well-placed. Hanging a mirror near a light or window can help reflect light, making the space look brighter and bigger. That reflected light can go a long way in lighting up a dim room!

6. Focal Point Focus

Another way to make your space look upscale is picking a more expensive light to be a focal point, while adding other less spendy lights to light up the room. The eye will be drawn to the focal point and won’t notice anything else! To start, install a chandelier to draw attention away from any existing recessed lights. Throw in a floor lamp where you need some extra lighting and–voilà! Your eye will be drawn to the chandelier, but the room will still be beautifully lit.

7. Add Lamps, Lamps, and more Lamps!

When in doubt, add a lamp! They’re cheaper, require little to no installation, and are a great design piece. Tabletop lamps make great decor for your tablescape and can light up a workspace. Floor lamps create a homey conversation area in a living room. Lamps are a super versatile, budget-friendly option to give just the touch of light you need.

—

We know that when you’re on a budget, every penny you spend matters! To be sure you’re spending all of them wisely, give us a call! We’ll match you with the best lighting solution for your budget and save you money so that you can get lights you love.

Filed Under: 2023, Bulbs, Buying Guides, Ceiling Lights, Lamps, Light Bulbs, Mirrors, Styles and Trends, Wellness & Safety

How to Use Patterns and Textures in Every Room of Your Home to Personalize Your Space

How to Use Patterns and Textures in Every Room of Your Home to Personalize Your Space

by admin · Feb 12, 2023

Interior design trends seem to cycle back and forth every five to ten years. And right on cue, after a long stretch of neutral minimalism, maxalimist living has taken designers and influencers by storm!

The rise of maximalist design doesn’t mean you have to redo your entire home. But it gives you an excellent opportunity to touch up your existing space with bold patterns.

We’ll give you top ideas for incorporating patterns for any design aesthetic throughout your home! Then you can adapt these tips to your own style, budget, and space.

Kitchen

Your kitchen is the heart of the home, and so the style influences here will change how the rest of the house feels. 

So if you’re ready to change up the balance of your white cabinets and walls, try a few of these tips:

  • Custom backsplash: An easy way to increase the function and design of your home is by installing a backsplash that matches your unique style. With endless tile options, you can create a minimalist pattern or a loud mosaic impact with bright colors.
  • Runner rugs: Tired of aching feet and a crumby floor? Runner rugs make your home safer, cleaner, and prettier. Line your floors with patterned rugs to add dimension and enjoyment to your dinner prep.
  • Display plates and dishes: The shift to a more maximalist design includes incorporating personal touches to your decor. So display your inherited china or thrifted dishes for another layer of patterns and history.
  • Island pendants: Create a final dimension of patterns with light! Your pendant shades can create shadows, new colors, or bright spotlights to increase the variety of your home.

Bathroom

Bathrooms are often a tricky space to decorate– you want to enjoy your space, but you usually don’t have room to embellish much. With a little creativity (and courage) you can pack a punch with some washroom-approved patterns. 

Try adding some layers by updating your:

  • Wallpaper: Make an impact without taking up needed space with wallpaper. Add natural neutrals, bold art deco, or geometric modern to immediately glow up the area.
  • Tile work: Bathrooms offer so many opportunities to use tile. Redo your countertop, create a backsplash, touch up the floor, or renovate your tub and shower!
  • Vanity lights: The lighting around your mirror is another way to play with patterns. Whether it’s a custom shade or a unique number of lights, it’s another valuable investment that will significantly impact your bathroom. 
  • Textiles: Incorporate your towels, washcloths, and rugs into your design to save space and add beauty. Using contrasting colors and patterns, you can use these textiles as an accent layer in your design.

Hallways

Your hallways are a tricky spot– not much light, wall space, or floor space is available to show your personality. But these small, narrow spaces are a great place to incorporate some maximalist colors and patterns.

Some space-saving, high-impact design tips include: 

  • Sconces: Create a new rhythm for your hall by spacing out wall sconces along the way. You can add beauty and light to any hall, from DIY peel-and-stick to professionally installed hard-wired options.
  • Textured walls: Add interest to your walls with custom board and batten or wood strips. It’s easy to customize, install, and match to any color scheme.
  • Runners: Protect high-traffic walkways with a runner rug! You’ll extend the life of your wood or carpet floors and add another layer of color and exciting patterns.
  • Eclectic gallery: While most hallways don’t have much open wall, an eclectic gallery can fit the smallest spaces. You’ll add color, personality, and pattern with a few frames tucked between doorways!

Bedrooms

Your family bedrooms are a great place to match your unique personality. While the rest of the house may stick to one theme, this private space can be anything you want.

We recommend playing with:

  • Curtains: Layer curtains for a custom layout and better sleep. Blackout curtains usually have less design variety, but you can layer them with patterned sheer curtains for a daytime set.
  • Accent walls: Create the perfect focal point for your personal domain with wallpaper or use wood planks in a custom design.
  • Bedding: Use a floral, geometric, or playful bedspread to display your personality. Or, if you like to change your look often, use a white bedspread and rotate patterned throws throughout the year.
  • String lights: Create soft light patterns by stringing fairy lights around your room. For an added layer, swap fairy lights for color-changing LEDs!

Dining Room

Whether your dining area is a dedicated room or a nook off the kitchen, it should be defined as a separate space. Then you can leave the work of food preparation stress in the kitchen and switch to relaxation and connection as you eat. 

Define the space by:

  • Distinct wall treatments: Change the mood by using different colors and shapes for your dining walls. Patterned wallpaper is an easy way to get a professional finish without detailed work!
  • A bold divider: If your dining room shares the space with your kitchen, add texture and pattern with a wall divider. From eclectic to traditional, you’re sure to find the right touch for your space.
  • Unique lighting: Signal a mood change with your lighting choices. Using a different style of pendant or chandelier from the kitchen will disrupt the food-making pattern.
  • Playing with upholstery: Use a table runner, placemats, or statement upholstered chairs for an added layer of personality.

Living Room

From hosting parties to a quiet movie night, your living room provides a comfortable space to relax and enjoy. But relaxation doesn’t mean it has to be quietly predictable. 

Try some of these tips to maximize design in your shared “unwind” space:

  • Wallpaper the ceiling: Do a unique riff on traditional wallpaper by wallpapering the ceiling. You’ll create interest by adding pattern and color to an ordinarily neutral space.
  • Change neutral patterns with colored LEDs: Prefer a neutral room but want to up the anti for parties? Then try color-changing LEDs to turn your neutral wallpaper into something bright and playful.
  • Swap pillow covers: Even in the most neutral space, you can add pattern and dimension with new pillow covers. Corduroy, leather stripes, or soft florals will make your sofas look brand new.
  • Layer rugs: Layering rugs is a new standard for luxe-looking living rooms. You can keep it simple with a muted border or play up the patterns with a modern geometric display.

Home Office

More people than ever have a dedicated work space from home– but have you taken the time to craft a space that works best for you and your tastes? 

Create interest in your Zoom meetings (without lagging virtual backgrounds) with some of these tips:

  • Accent wall for the camera: Show your personality to your coworkers and clients with a beautiful accent wall in sight of your camera. It will beat your cubical or office walls anyways!
  • Interesting lamp shades: Create shadow or color with a unique lamp shade. You’ll improve visibility and do better work, too!
  • Computer mat: Keep your workspace clean, organized, and attractive with a patterned laptop mat. You can cover your entire desk for a comprehensive update or accent your space with a keyboard-sized mat.
  • Reading chairs: Add flavor to your room with an accent reading chair or two. Reading chairs offer an excellent opportunity to introduce new patterns to the room without going overboard.

After years of minimalist, copy-paste interior design, it’s time to breathe new personality and individualism into our homes with some playful patterns. Go for whatever suits you best. You keep your minimalist aesthetic and introduce a few subtle patterns and textures. Or, you can go all in on a complete redesign and bring bold, beautiful patterns and colors throughout your home! 

Whatever your style, there are endless ways to incorporate patterns and embrace your favorite designs.

Need Help?

Proper lighting is essential to a fully functioning home– but it can be challenging to nail balanced brightness, great fixtures, and a budget! Contact the experts at Super Lite for advice on your project!


Filed Under: 2023, Bathroom Lights, Ceiling Lights, Lamps, LED Lights, Styles & Trends, Styles and Trends, Wall Lights

Everything You Need to Know About DIY Track Lighting

Everything You Need to Know About DIY Track Lighting

by admin · Jan 12, 2021

Track lighting can be a wonderful addition to your home. These stylish, functional pieces have limitless uses, including:

  • Directional task lighting
  • Over-the-table or kitchen island lighting
  • Artwork spotlight lighting
  • Over-the-mantle lighting
  • Eye-catching general lighting

Designers have traditionally used track lighting in narrow hallways or to highlight art on the wall in studies, but because of its incredible flexibility, it is now used more extensively in living rooms, bathrooms and even bedrooms. This adds a contemporary touch to almost any space, making it perfect for a new build home or for renovated spaces in an existing home.

However, because multiple pieces are needed to assemble a functional track lighting system, picking the right one for you can seem daunting. The good news is that simple track lighting systems are made up of three different pieces, and knowing more about them can help you pick the right one. 

1. The Track

First, take a look at the track itself. If you’re buying an all-inclusive fixture, style and size are your primary concerns. Is it large enough for your space? Will it perform its function and add the style you want?

If you’re purchasing components separately to create a custom fixture, keep in mind that different companies use different “styles” of track. Most companies sell tracks in segments ranging from 2’ to 8’, usually in H-style, J-style, and L-style. Any style will work, as long as you make sure ALL the components are the same style.

2. The Power Source

Examine the space where you’ll place the track lighting. The power source can be added in the middle of the track, or on the end, depending on your needs. If your electrical box is between each end of the track, use a floating canopy. If your track system will begin at the electrical box, you will need a live end feed power source. 

3. The Track Heads

These heads will add your personal style to the track, in addition to facilitating the light source. Similarly, select your bulb based on the task and atmosphere it’s meant to serve, whether it’s an integrated LED head or a standard light bulb socket. To attach the track heads, simply insert the connection points inside the track and rotate the connection point until they lock in place. 

WHITE R20 STRAIGHT CYL

4. Custom Built vs. All-Inclusive Tracks

Top-tier track lighting companies, such as Nuvo Lighting, offer countless kits that include all three components. They’re ready for assembly and easily to install, and you know exactly how your track light will turn out.

On the other hand, they also sell the components separately to enable full customization. This way, you can create a track lighting fixture that fits your exact needs and style, even if it requires a bit more work to keep things consistent.

Keep in mind that some types of track lighting require additional parts. For example, a Flexrail system uses mounts with posts that suspend the track from the ceiling, instead of mounting it flush to the drywall. 

Now that you know the basics, you’re ready to tackle your own lighting project! As always, feel free to contact one of our lighting experts with any questions. Here’s to you and keeping your track lighting project on track!

Filed Under: 2020, Ceiling Lights, Styles & Trends

Timeless VS. Trendy: Which Works Best In Your Home?

Timeless VS. Trendy: Which Works Best In Your Home?

by admin · Dec 8, 2020

Keeping up with trends, whether commercially or only as an observer, can be a fun hobby! There’s so much variety, beauty, and class in this world. However, trends in fashion, décor, and even lighting, revolve quickly. If you’re thinking of replacing a more permanent part of your home, such as the flooring, plumbing, or lighting, it’s tricky to be trendy and timeless at the same time.

So how do you decide? Should you choose the latest look, with all the “Ooh”s and “Ahhh”s it’ll bring? Or should you be conservative and avoid something you’ll regret in 5 years? After all, tiny details can date a home. You know, wallpaper from the 70’s, pink tile in the 80’s, burgundy and forest green from the 90’s, bronze and faux finishes from the early 2000’s…

There isn’t one right way to go about this, nor is there one easy answer to the “trendy vs. timeless” debate. However, here are a few things to consider.

It’s Not All or Nothing

You may love some of the styles that have withstood the test of time: subway tile, herringbone (fabric and flooring), or wood floors. That’s great! On the other hand, that doesn’t mean that you can’t also incorporate this year’s hot paint colors and some trendy macramé hangings into your décor as well. Don’t try to decide everything at once, and don’t base all your decisions off of one piece of your home.

Consider Your Resale Plans

There are some cases when it’s better to choose trendy décor and finishes, even if the current trend is not your personal favorite. If you’re building a new home, remodeling, or flipping a home with any intention to sell soon, go trendy. Homes that are on trend show well and sell faster.

Avoid Over-Decorating

Though you could argue that “minimalism” is a trend in itself, we’re convinced that good use of space is timeless. Though it can be tempting to fill every shelf or cover every wall with your latest finds, an over-decorated, crowded space diminishes the artistic effect of any style. In addition, it’ll be easier to update your look later if you have few, carefully chosen accent pieces that can rotate with the next trend.

Be Smart About Trendy

If you’re like most people, you probably don’t have unlimited time and funds to remodel the kitchen or buy a new couch every time popular trend takes a new direction. However, there are plenty of simple, cost-effective ways to make your space trendy and new. Here’s a list of our favorite ideas!

1. Change an indoor paint color. Indoor paint runs its course in about 5 years, so it makes sense. You could even start with a small room… less time, big reward!

2. Rotate your rug or change it altogether. Rugs have a natural knap to them depending on how they are woven. A quick rotation may surprise you with a significant difference.

3. Update your throw pillows on the bed and couches. It’s a quick, cost-effective change!

4. Especially during the winter, add a plant or some kind of earthy décor element to bring a natural, refreshing feel to your space.

5. Switch out some art. Frames may be pricey, but prints usually aren’t! Buy a new family photo, modern print, or custom piece of art to freshen up your frames

6. Replace a key lighting fixture. In addition to updating your look, switching to new bulbs will save you money on your utility bill. Check out our catalog for some good recommendations!

7. Buy new dish towels or dinnerware. An extra pop of color can change the atmosphere in the kitchen or add some extra fun at dinner. 

Make Your Home Your Own

Trends will come and go… And traditional styles? Even there, there’s a ton of variation! Contemporary. Transitional. Rustic. Vintage. Urban. Eclectic… no matter the style, take the time to create a home environment that speaks to you. If it suits your needs and appeals to your unique style, it’ll be timeless. Best of luck from Super Lite in your decorating adventures!

Filed Under: 2020, Ceiling Lights, Styles & Trends

« Previous Page
Next Page »

Copyright © 2025